In this article, we’ll look at how to display WordPress tags, categories, and taxonomies on your website.
Displaying WordPress Tags
Let’s explore how to display all tags as a single list on your WordPress site’s pages. There are various ways to structure a website built on the WordPress content management system. You can create multiple categories and organize all posts into them, or you can create a single category but use many tags that are assigned to different posts.
If you’re using the second option, as on this site—where all posts are in a single category but have different tags—you may sometimes need to display a list of all tags as a list or menu.
Here’s an example of a site where a list of all tags appears below the menu:

Example of displaying tags on the front end
This isn’t difficult to do, but you need to be familiar with WordPress themes and understand which theme files are responsible for what, in order to display all WordPress tags where needed.
So, let’s display all tags as a list.
Tags
The function get_tags( ) retrieves an array of objects for each term in the post_tag.
echo "Все теги:<br/>";

$args = array(
    'orderby'                  => 'name',
    'order'                    => 'ASC',
    'public'                   => true,
);

$tags = get_tags( $args );

foreach ( $tags as $tag ) {
     echo '<a href="' . get_tag_link( $tag ) . '">' . $tag->name . '</a><br/>';
}
Categories
The function get_categories( ) returns an array of category objects that match the query parameters.
echo "Категории:<br/>";

$args = array(
    'orderby'                  => 'name',
    'order'                    => 'ASC',
    'public'                   => true,
);

$categories = get_categories( $args );

foreach ( $categories as $category ) {
     echo '<a href="' . get_category_link( $category ) . '">' . $category->name . '</a><br/>';
}

echo "<hr>"; // разделитель
Taxonomies
The get_taxonomies() function returns a list of registered taxonomy objects.
echo "Taxonomies:<br/>";

$args = array(
    '_builtin'                 => false,
    'public'                   => true,
);

$taxonomies = get_taxonomies( $args, 'objects' );

foreach ( $taxonomies as $taxonomy ) {
    echo '<p>' . $taxonomy->labels->name . '</p>';
}
Post Types
The function get_post_types( ) returns the registered post types found in $wp_post_types. The get_posts( ) creates an array of posts based on a set of parameters, so use it with a list post_type_list.
echo "Типы постов:<br/>";

$args = array(
    'public'   => true,
    '_builtin' => false,
);
$output = 'names'; // names or objects, note names is the default
$operator = 'and'; // 'and' or 'or'
$post_types = get_post_types($args, $output, $operator);

// get all the posts for all post_types

$posts = get_posts(array(
                           'post_type'   => $post_types,
                           'numberposts' => - 1,
                           'orderby'     => 'post_type',
                           'order'       => 'ASC',
                           'post_status' => array( 'publish' ),
                           'public'      => true,
                       ));

foreach($posts as $post) {

    $link = get_permalink($post);
    $title = $post->post_title;

    if($post_type !== $post->post_type) {
        $post_type = $post->post_type;
        echo '</br/><p>' . $post_type . '</p></br/>';
    }

    // показать ссылку на запись

    echo "<p><a href=\"$link\">$title</a></p>";
}
Transient caching. If you want to cache the results of all these queries, consider the Transients API. This will allow you to store the result in the database for a limited time (which you ~specify~). This is not a fixed duration, because plugins such as WP Optimize can clear the cache at any time.
// check if the value exists using the key -- if it fails then we'll generate the content

if(false === ($trans_value = get_transient($trans_key = 'my_transient_key'))) {

    print_r('NO CACHE FOR ' . $trans_key); // (debug output)

    // start the output buffer to capture our generated content

    ob_start();

    // run your expensive operations -- data sent to the screen will be captured

    print_r('This is an expensive operation!');

    // using ob_get_clean we'll store the results and set the value variable.

    // double check the amount of time you want to keep the data cached
    // set to 0 for auto loading on every page hit.

    set_transient($trans_key, $trans_value = ob_get_clean(), 1 * MINUTE_IN_SECONDS);
}
else {
    print_r('THIS IS A CACHED RESULT FOR ' . $trans_key); // (debug output)
}

// value is ready and cached
print_r("<pre>$trans_value</pre>");
To clear a value, simply delete it using its key.
delete_transient ( $trans_key );Term metadata. You can retrieve thumbnails for terms using the new term metadata introduced in version 4.4. You’ll just need to define them yourself in advance.
add_term_meta( int $term_id, string $meta_key, mixed $meta_value, bool $unique = false )

get_term_meta( int $term_id, string $key = '', bool $single = false )

update_term_meta( int $term_id, string $meta_key, mixed $meta_value, mixed $prev_value = '' )
I used the method described above for tags on this site, displaying all WordPress tags in a dropdown menu at the top of the homepage.
But now, let’s take a look below at how to display popular WordPress tags both with and without a plugin.
Popular WordPress Tags
Want to display the most popular tags used on your WordPress site?
Tags and categories are the two default ways to organize content in WordPress. You can also add custom post types, but they’re used much less frequently than classic tags and categories.
Categories often get more attention because of their broader scope. In this article, we’ll show you how to easily display your most popular tags in WordPress, since you shouldn’t underestimate the power of tags.
Categories and tags are the two default taxonomies for organizing your posts in WordPress. Categories are used for broader topics or sections of your site, while tags are well-suited for specific ideas within the context of your posts.
Beginners often use them incorrectly, but there are simple tools that let you combine categories and tags and even convert them.
Once you start using categories and tags correctly, your site will likely have more tags than categories. Because of their broader scope, you can place categories in navigation menus, but your tags often remain less visible.
One way to solve this problem is to add the standard “Tag Cloud” widget by going to the “Appearance” page and adding the “Tag Cloud” widget to the sidebar.
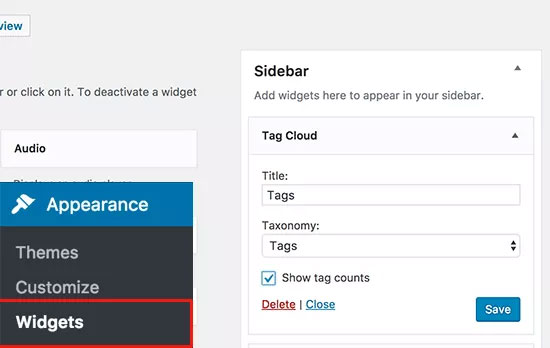
However, you’ll notice that the default tag widget displays all your tags in alphabetical order. You can’t change their order or limit the number of tags displayed.
You can solve this problem by displaying the most popular or most frequently used tags on your WordPress site.
This will allow your users to quickly get an idea of which topics are most frequently discussed on your site. It will also help users discover more content, which means more page views and user engagement.
Now let’s look at two ways to display your most popular tags in WordPress—using a plugin and using code.
1. Using a Plugin
I’m not a fan of using plugins in most cases, but there’s no getting around it, since in some cases, development teams have created very convenient solutions.
This method is simpler and is recommended for most users.
The first thing you need to do is install and activate the Simple Tags plugin.
After activation, go to Appearance -> Widgets and add the “Tag Cloud (Simple Tags)” widget to the sidebar.
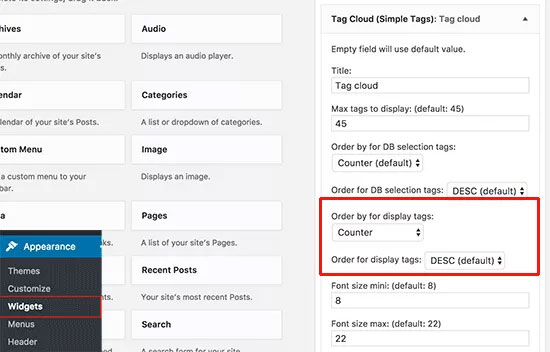
The widget will expand, and you’ll be able to see its settings.
Here you can choose the number of tags you want to display, font sizes, colors, and so on.
To display your tags by popularity, make sure you’ve selected “Descending” for the “Order by for display tags” option and “Descending” for the “Order for display tags” (Sort for display tags).
Don’t forget to click the Save button to save the widget settings. Now you can visit your site to see your popular tags in action.
2. Using Code
This method requires adding code to your WordPress theme files. If you haven’t done this before, please check out my guide on copying and pasting code in WordPress.
First, you’ll need to add the code below to your theme’s functions.php file or to a site-specific plugin file.
function wpb_tag_cloud() {
$tags = get_tags();
$args = array(
    'smallest'                  => 10,
    'largest'                   => 22,
    'unit'                      => 'px',
    'number'                    => 10,
    'format'                    => 'flat',
    'separator'                 => " ",
    'orderby'                   => 'count',
    'order'                     => 'DESC',
    'show_count'                => 1,
    'echo'                      => false
);

$tag_string = wp_generate_tag_cloud( $tags, $args );

return $tag_string;

}
// Add a shortcode so that we can use it in widgets, posts, and pages
add_shortcode('wpb_popular_tags', 'wpb_tag_cloud');

// Enable shortcode execution in text widget
add_filter ('widget_text', 'do_shortcode');
This code simply generates a tag cloud of your site’s 10 most popular tags, showing the number of posts for each tag. It then creates the wpb_popular_tags shortcode and enables you to insert it into a text widget.
Now you can add the [wpb_popular_tags] shortcode to any post, page, or widget to display your most popular tags.
You can also use the shortcode in any theme file via PHP:
<?php echo do_shortcode('[wpb_popular_tags]'); ?>Keep in mind that do_shortcode it only works when we output it via echo. Otherwise, you won’t see your shortcode.
Update!
For me, the solution above from wpbeginner.com didn’t display the links—that is, the links were there, but with an empty href.
I modified their code as follows:
function wpb_tag_cloud() {
$args = array(
    'smallest'                  => 14,
    'largest'                   => 14,
    'unit'                      => 'px',
    'number'                    => 10,
    'format'                    => 'flat',
    'separator'                 => " ",
    'orderby'                   => 'count',
    'order'                     => 'DESC',
    'show_count'                => 0,
    'echo'                      => false,
    'include'                   => $term_ids
);

$tag_string = wp_tag_cloud( $args );

return $tag_string;

}
// Add a shortcode so that we can use it in widgets, posts, and pages
add_shortcode('wpb_popular_tags', 'wpb_tag_cloud');

// Enable shortcode execution in text widget
add_filter ('widget_text', 'do_shortcode');
The default settings for the tag cloud wp_tag_cloud are as follows:
$defaults = array(
        'smallest'   => 8,
        'largest'    => 22,
        'unit'       => 'pt',
        'number'     => 45,
        'format'     => 'flat',
        'separator'  => "\n",
        'orderby'    => 'name',
        'order'      => 'ASC',
        'exclude'    => '',
        'include'    => '',
        'link'       => 'view',
        'taxonomy'   => 'post_tag',
        'post_type'  => '',
        'echo'       => true,
        'show_count' => 0,
    );
This is a perfectly normal solution that can be easily customized with CSS and placed in the desired location on the site.
In my example, I set all WordPress tags to have the same font size of 14px, but you can specify your own sizes in smallest and largest.
