Sometimes we need to use dynamic or single-page applications on our websites. To do this, we can use “reactive” JavaScript programming tools (or frameworks).
In this article, I’ll show you how to use Svelte.js with our Go-based server to build our website. For this example, I’ve chosen the gofiber as the web server package. Let’s get started!
Creating a Basic Gofiber Web Server
The project structure on the Go side will look like this.
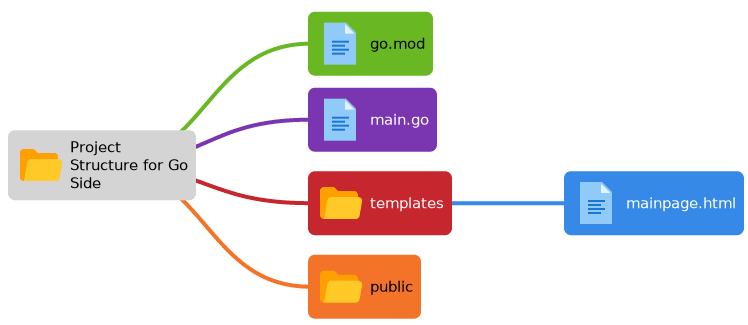
First, we need to initialize the go.mod file.
As a second step, we can create the main.go file as follows:
package main

import (
    "github.com/gofiber/fiber/v2"
)

func main() {
    app := fiber.New()
    app.Static("/public","./public")
    app.Get("/", mainPage)
    app.Listen(":3000")
}

func mainPage(c *fiber.Ctx) error {
    //This function will be see different soon
    return c.SendString("Hellö")
}
After creating the Svelte project, we’ll modify the Go portion.
Let’s create a simple Svelte project based on this Go project.
Creating a Basic Svelte Project
Here’s how:
npx degit sveltejs/template . --forceWe use the flag --forcebecause the project folder is not empty.
After:
npm installto install all dependencies.
To verify, we can run the command npm run dev.
If everything works, we can move on to the next step.
So, we’ve added some files to the *public* folder.
To use Svelte with Go, we need to change some settings on the Svelte side.
Step 1.
rollup.config.js
...
svelte({
            compilerOptions: {
                // enable run-time checks when not in production
                dev: !production,
                customElement: true,
            }
        }),
...
We need to add the following line customElement: true.
This addition will help separate the component from the base project.
This way, we can add a component using the element’s name—for example, <app/>, to our Go templates.
Step 2.
We can apply changes on the Svelte side without restarting the Go application.
To do this, you need to comment out a single line in the rollup.config.js file.
// In dev mode, call `npm run start` once
        // the bundle has been generated
        //!production && serve()
!production && serve() must be commented out.
Step 3.
Edit the ./src/main.js file.
This file will look like the example below.
import App from './App.svelte';We will use only the line import.
In this code, we imported a component named App, but the name doesn’t matter. First, we’ll specify the component’s tag from its file.
Step 4.
Edit ./src/App.svelte:
<script>
    // It can be empty for this example
</script>
<svelte:options tag="my-app"/>
<p>My App</p>
<style>
    /* It can be empty :) */
</style>
Using these steps, we can use the App component as a tag <my-app/>.
We’re done with the Svelte.js side. Now we can move on to the Golang side.
First, we’ll define the template rendering engine.
Edit the main.go file as shown below.
package main

import (
    "github.com/gofiber/fiber/v2"
    "github.com/gofiber/template/html"
)

func main() {

    //template render engine
    engine := html.New("./templates", ".html")

    app := fiber.New(fiber.Config{
        Views: engine, //set as render engine
    })
    app.Static("/public", "./public")
    app.Get("/", mainPage)
    app.Listen(":3000")
}
Don’t forget to run the command go mod tidy 🙂
Now let’s modify the main page function as shown below.
func mainPage(c *fiber.Ctx) error {
    return c.Render("mainpage", nil)
}
and modify ./templates/mainpage.html as follows.
<!DOCTYPE html>
<head>
    <meta charset="UTF-8">
    <title>My Page</title>
    <link rel='stylesheet' href='/public/global.css'>
    <script defer src='/public/build/bundle.js'></script>
</head>
<body>
    <my-app/>
</body>
</html>
We can name the component App as my-app.
Final Step
Method 1.
We can run the application using these commands.
npm run build compiles the bundled JS file.
go run . Starts the web server.
Method 2.
We can run the application using this command:
npm run dev & go run .This way, if we reload the web page, you’ll be able to see the changes without restarting the Go application. However, this is only useful for changes on the Svelte side.
Tips
We can start the server easily by creating a Makefile.
Create a Makefile in the project directory. Like this:
run:
    npm run dev & go run .
build:
    npm run build
and in the terminal, run the following commands make run or make build.
The project repository on GitHub.
